Signs and Symptoms of Mold in Your Home
Do you suspect that your home may have a hidden mold problem? Mold can be a silent invader, lurking in damp corners and dark spaces, often going unnoticed until the issue becomes more severe. However, there are several telltale signs that may indicate the presence of mold in your living environment.
One of the most obvious signs is a musty, earthy odor. If you notice a persistent, unpleasant smell in your home, it could be a sign that mold is growing somewhere. Mold thrives in damp, humid conditions and often feeds on organic materials like wood, paper, or fabrics. As it grows, it can release spores and volatile organic compounds (VOCs) that contribute to the distinctive musty smell.
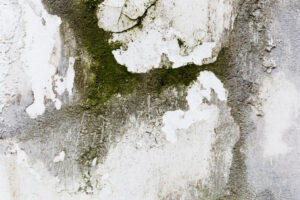
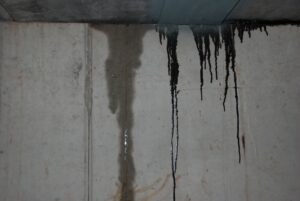
Another common indicator of a mold problem is the visible presence of mold growth. Look for discoloration on walls, ceilings, or other surfaces, such as greenish, black, or brown spots. Mold can also appear as a fuzzy or slimy texture, depending on the type of mold and the surface it’s growing on. Be especially vigilant in areas prone to moisture, such as bathrooms, basements, or around leaks or water damage.
In addition to physical signs, mold exposure can also lead to various health symptoms, including respiratory issues, allergic reactions, and even more severe health problems. If you or your family members are experiencing persistent coughing, sneezing, eye irritation, or respiratory distress, it may be worth investigating the possibility of a mold problem in your home. These health effects can be particularly concerning for individuals with weakened immune systems, respiratory conditions, or allergies.
Health Risks Associated with Mold Exposure
Mold exposure can have significant health consequences, and it’s essential to understand the potential risks associated with it. Inhaling or coming into contact with mold spores can trigger a range of health problems, some of which can be quite serious.
One of the most common health issues associated with mold exposure is respiratory problems. Mold spores can irritate the airways, causing coughing, wheezing, and difficulty breathing. In individuals with asthma or other respiratory conditions, mold exposure can exacerbate symptoms and lead to more severe asthma attacks.
Allergic reactions are another common health concern linked to mold exposure. Mold can trigger the release of histamines, leading to symptoms such as sneezing, runny nose, itchy eyes, and skin irritation. For individuals with mold allergies, the exposure can be particularly problematic, causing more severe and prolonged reactions.
In some cases, mold exposure can also contribute to more severe health conditions, such as lung infections, including pneumonia and aspergillosis. These infections can be especially dangerous for individuals with weakened immune systems, such as the elderly, young children, or those with chronic illnesses.
Additionally, exposure to certain types of mold, such as Stachybotrys chartarum (also known as “black mold”), has been linked to more serious health issues, including neurological problems, memory loss, and even potential links to certain types of cancer. While the research on these more severe health effects is still ongoing, it’s crucial to take mold exposure seriously and address any potential mold problems in your home promptly.
DIY Mold Testing Methods
Detecting the presence of mold in your home is the first step towards addressing the issue and creating a healthier living environment. While it’s possible to hire professional mold testing services, there are also several DIY mold testing methods that you can use to assess the situation in your home.
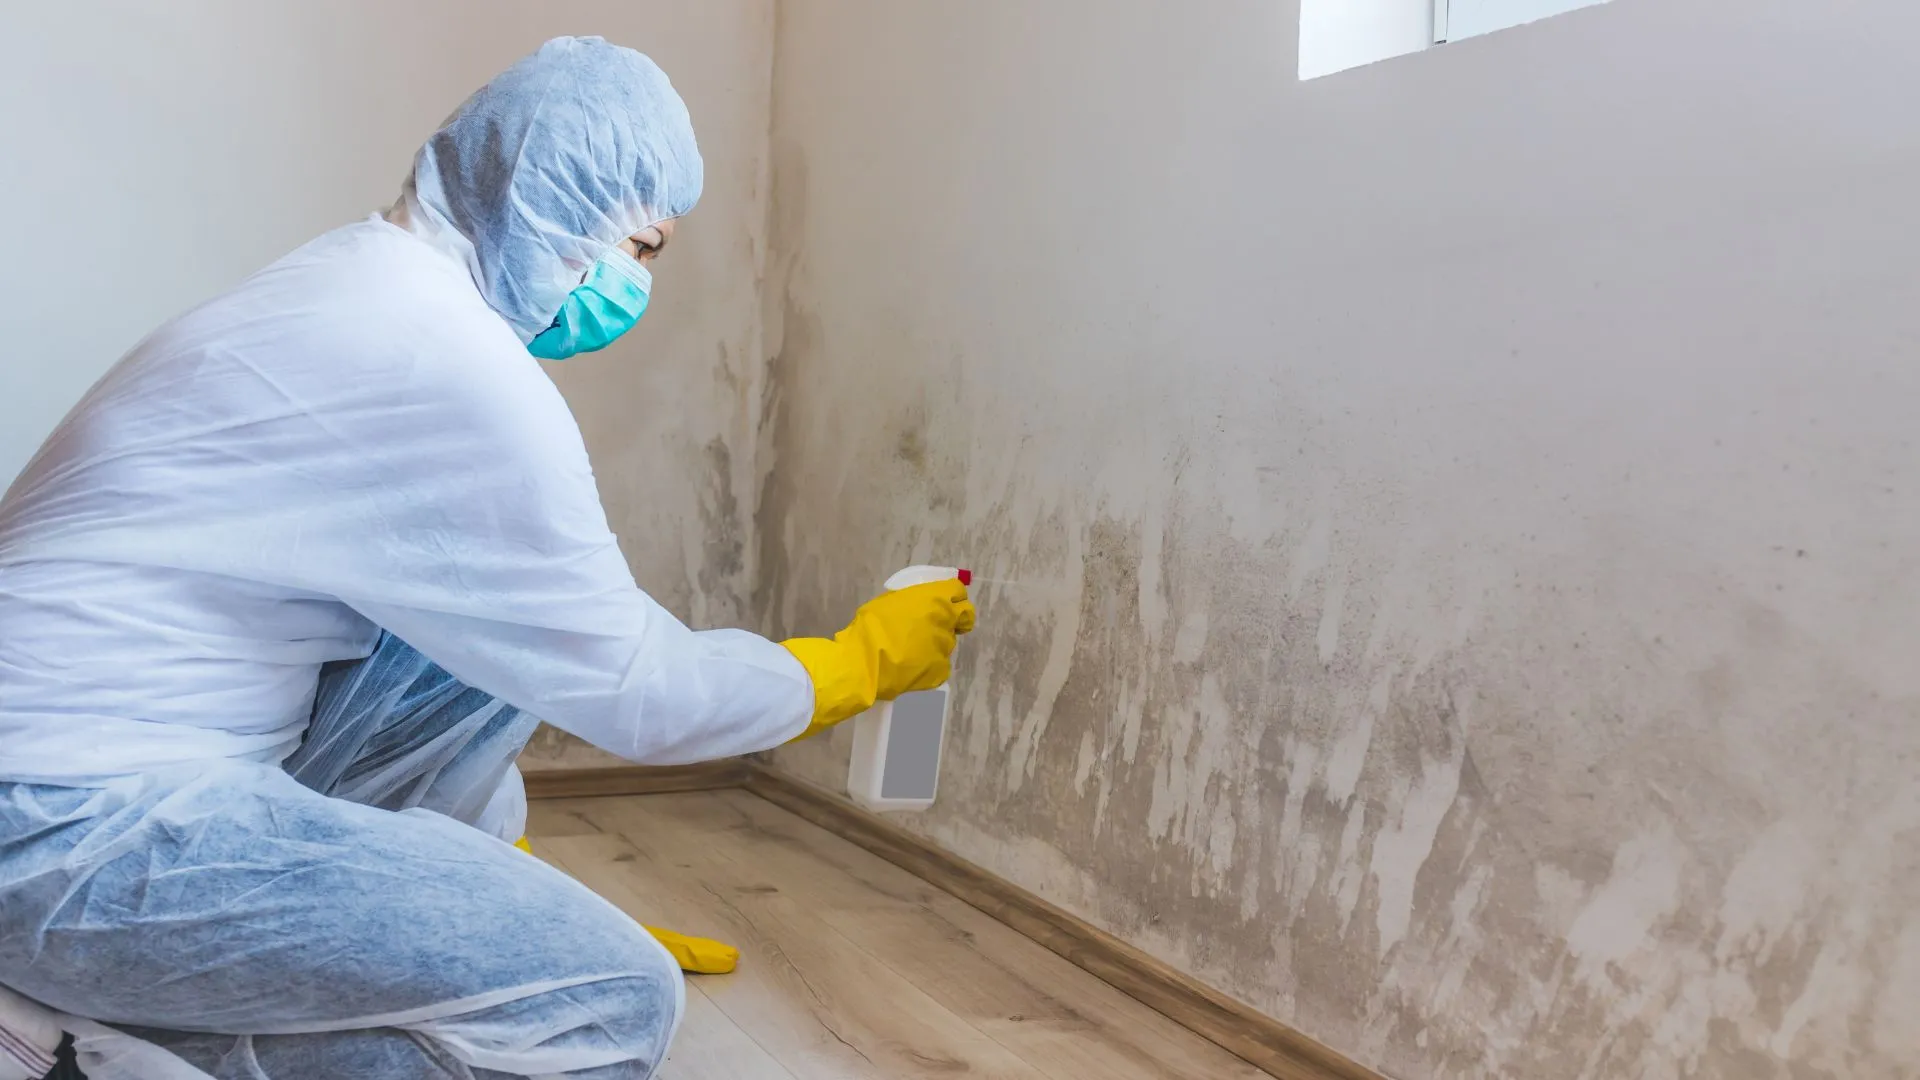
One of the simplest and most accessible DIY mold testing options is the visual inspection. Start by thoroughly examining your home, focusing on areas that are prone to moisture or water damage, such as bathrooms, basements, and around leaks or water stains. Look for visible signs of mold growth, such as discoloration, fuzzy or slimy textures, or musty odors. Be sure to check behind furniture, in corners, and in other hard-to-reach areas where mold may be hiding.
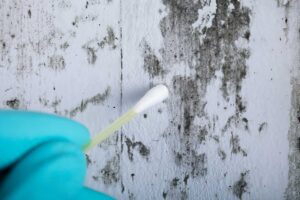
Another DIY mold testing method is the use of mold testing kits. These kits typically include a petri dish or swab that you can use to collect a sample of the suspected mold growth. The sample is then sent to a laboratory for analysis, which will provide you with information about the type and concentration of mold present in your home. Mold testing kits can be purchased from various home improvement stores or online retailers, and they often come with detailed instructions on how to properly collect and submit the sample.
If you’re concerned about the potential health risks associated with mold exposure, you may also consider hiring a professional mold inspector. These experts have specialized training and equipment to conduct a comprehensive assessment of your home, including air quality testing and more advanced mold detection methods. While this option may be more expensive than DIY testing, it can provide you with a more thorough understanding of the mold situation in your home and help you develop an effective remediation plan.
Regardless of the method you choose, it’s important to remember that accurately identifying and addressing a mold problem requires a careful and diligent approach. By taking the time to properly assess the situation, you can ensure that you’re taking the necessary steps to protect your health and the well-being of your family.
Step-by-Step Guide to Conducting a Visual Inspection for Mold
Conducting a thorough visual inspection is often the first step in the DIY mold testing process. By carefully examining your home for signs of mold growth, you can identify problem areas and determine the next course of action. Follow these step-by-step instructions to perform a comprehensive visual inspection for mold in your home.
Begin by gathering the necessary supplies, which may include a flashlight, a magnifying glass, and a camera or smartphone to document your findings. It’s also a good idea to have a notepad and pen handy to jot down any observations or areas of concern.
Start your inspection in the areas of your home that are most prone to moisture and water damage, such as bathrooms, kitchens, basements, and around windows or plumbing fixtures. Carefully examine the surfaces, looking for any discoloration, staining, or textural changes that may indicate the presence of mold. Pay close attention to corners, crevices, and behind furniture, as mold can often grow in these hidden spaces.
As you conduct your visual inspection, be on the lookout for other signs of mold, such as a musty or earthy odor. Mold can release volatile organic compounds (VOCs) that contribute to this distinctive smell, so be sure to take note of any unusual scents in your home.
If you do discover areas of suspected mold growth, take photographs to document the extent and location of the problem. This visual record can be helpful when interpreting the results of any subsequent mold testing or when discussing the issue with a professional remediation company.
Remember to pay attention to your own health during the inspection process. If you begin to experience any respiratory symptoms, such as coughing, sneezing, or difficulty breathing, it’s best to stop the inspection and seek medical attention, as these could be signs of mold exposure.
Once you’ve completed your visual inspection, review your notes and photographs to determine the next steps. If you’ve identified areas of significant mold growth or have concerns about the potential health risks, it may be time to move on to more advanced mold testing methods or to consult with a professional mold remediation specialist.
Using Mold Testing Kits for Accurate Results
While a visual inspection can provide valuable insights into the presence of mold in your home, it’s often not enough to accurately identify the type and extent of the problem. For more precise results, you may want to consider using a mold testing kit, which can help you collect and analyze samples to determine the specific mold species present.
Mold testing kits are widely available and can be purchased from home improvement stores, hardware retailers, or online. These kits typically include instructions on how to properly collect a sample, as well as a prepaid mailer to send the sample to a laboratory for analysis.
When using a mold testing kit, it’s essential to follow the instructions carefully to ensure accurate results. Begin by identifying the areas in your home where you suspect mold growth, and select a spot that appears to be the most affected. Depending on the kit, you may be asked to use a swab or petri dish to collect a sample of the mold growth.
Once you’ve collected the sample, carefully package it according to the kit’s instructions and send it off to the designated laboratory. The lab will then analyze the sample and provide you with a detailed report, including information about the type of mold present, the concentration levels, and any potential health risks associated with the mold species.
It’s important to note that mold testing kits can vary in their accuracy and reliability, so it’s a good idea to research the reputation of the manufacturer and read reviews before making a purchase. Additionally, some mold species may be difficult to identify or require more specialized testing methods, so you may want to consider consulting with a professional mold inspector if you have any concerns about the accuracy of the results.
After receiving the results from your mold testing kit, review the information carefully and determine the next steps. If the results indicate the presence of a significant mold problem, you may need to consider professional mold remediation services to address the issue effectively and ensure the safety of your home and family.
Interpreting the Results of Your Mold Tests
Once you’ve conducted your mold testing, whether through a visual inspection or the use of a testing kit, it’s essential to interpret the results accurately. Understanding the findings will help you make informed decisions about the appropriate course of action to address any mold issues in your home.
If your visual inspection revealed visible signs of mold growth, such as discoloration, textural changes, or a musty odor, it’s likely that you have a mold problem that needs to be addressed. The extent and severity of the issue will determine the necessary steps for remediation.
When using a mold testing kit, the laboratory report will provide you with specific information about the type of mold present, the concentration levels, and any potential health risks associated with the mold species. This information is crucial in determining the appropriate course of action.
For example, if the report indicates the presence of a common household mold, such as Cladosporium or Penicillium, you may be able to address the issue through DIY mold removal methods. These types of mold are generally less harmful and can often be cleaned using a mixture of water and detergent or a mild bleach solution.
However, if the report identifies the presence of more concerning mold species, such as Stachybotrys chartarum (also known as “black mold”), it’s essential to take immediate action. Black mold is considered one of the most toxic types of mold and can pose serious health risks, particularly for individuals with weakened immune systems or respiratory conditions.
In cases where the mold testing reveals a significant problem, it’s best to consult with a professional mold remediation specialist. These experts have the necessary training, equipment, and expertise to safely and effectively remove the mold, address the underlying moisture issues, and restore your home to a healthy, mold-free environment.
Regardless of the results, it’s crucial to take any mold problem seriously and address it promptly. Ignoring or delaying the remediation process can lead to the further spread of mold, exacerbating the health risks and potentially causing more extensive damage to your home.
Taking Action if Mold is Detected
If your DIY mold testing has confirmed the presence of mold in your home, it’s essential to take immediate action to address the problem. Ignoring a mold issue can lead to the continued growth and spread of the fungus, as well as the potential for more severe health consequences for you and your family.
The first step in addressing a mold problem is to identify and address the underlying cause of the moisture that is allowing the mold to thrive. This may involve repairing leaks, improving ventilation, or addressing other sources of excess moisture in your home. Addressing the root cause is crucial, as simply removing the visible mold without addressing the underlying issue will likely lead to the problem recurring.
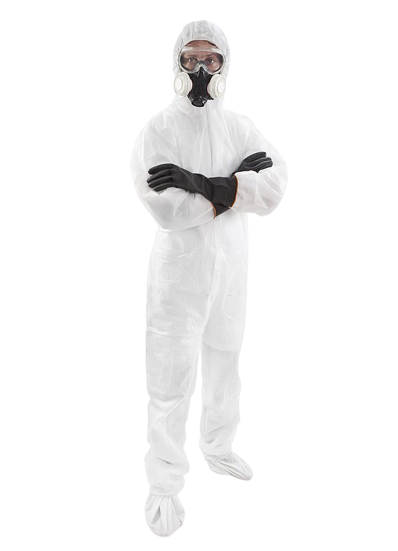
Once you’ve identified and addressed the moisture problem, you can begin the mold remediation process. Depending on the extent of the mold growth, this may involve a DIY approach or the need to hire a professional mold remediation company. For smaller, localized areas of mold growth, you may be able to handle the cleaning and removal yourself using appropriate personal protective equipment (PPE) and approved cleaning methods.
However, for more significant mold problems, or in cases where the mold growth is in hard-to-reach or hidden areas, it’s generally recommended to hire a professional mold remediation specialist. These experts have the necessary training, equipment, and expertise to safely and effectively remove the mold, dispose of contaminated materials, and ensure that the affected areas are properly cleaned and disinfected.
During the mold remediation process, it’s crucial to follow all safety protocols and guidelines to protect yourself and your family from potential health risks. This may include vacating the affected areas, using air filtration devices, and properly disposing of any contaminated materials. It’s also important to monitor the remediation process and ensure that the mold problem has been fully addressed before returning to the affected areas.
After the mold remediation is complete, it’s essential to take steps to prevent future mold growth in your home. This may involve implementing moisture control measures, such as improving ventilation, using dehumidifiers, and addressing any leaks or water damage promptly. Regular inspections and proactive maintenance can also help you identify and address any potential mold problems before they become more severe.
Preventing Mold Growth in Your Home
Preventing mold growth in your home is essential for maintaining a healthy indoor environment and avoiding the potential health risks associated with mold exposure. By taking proactive measures to control moisture and address any underlying issues, you can significantly reduce the likelihood of mold growth and ensure the long-term well-being of your family.
One of the most critical steps in preventing mold is to address any sources of excess moisture in your home. Mold thrives in damp, humid conditions, so it’s essential to identify and address any leaks, flooding, or high humidity levels. This may involve repairing plumbing issues, improving ventilation, using dehumidifiers, or addressing any water damage promptly.
Regular cleaning and maintenance can also play a significant role in preventing mold growth. Regularly clean and disinfect surfaces, particularly in areas prone to moisture, such as bathrooms, kitchens, and basements. Pay special attention to grout, caulking, and other porous materials, as these can provide an ideal environment for mold to take hold.
It’s also essential to monitor the humidity levels in your home and take steps to maintain them within an acceptable range, typically between 30% and 50%. Using dehumidifiers, exhaust fans, or other humidity control measures can help prevent the buildup of excess moisture that can lead to mold growth.
In addition to addressing moisture and humidity issues, it’s important to be vigilant in identifying and addressing any water damage or leaks promptly. Even small leaks or areas of dampness can quickly lead to mold growth, so it’s crucial to address these problems as soon as they are discovered.
Finally, consider investing in mold-resistant building materials and finishes when renovating or constructing your home. Look for products that are specifically designed to be more resistant to mold growth, such as mold-resistant drywall, paints, and sealants. These materials can help prevent mold from taking hold and make it easier to maintain a healthy indoor environment.
By taking a proactive approach to moisture control, regular cleaning, and the use of mold-resistant materials, you can significantly reduce the risk of mold growth in your home and safeguard the health and well-being of your family.
Conclusion and Final Tips for DIY Mold Testing
In conclusion, conducting DIY mold testing in your home is a crucial step in identifying and addressing any potential mold problems. By understanding the signs and symptoms of mold, the associated health risks, and the various testing methods available, you can take charge of your indoor air quality and create a healthier living environment for you and your family.
Remember, mold can be a serious health hazard, so it’s essential to take any suspected mold problem seriously and address it promptly. Whether you choose to conduct a visual inspection, use a mold testing kit, or consult with a professional mold inspector, the key is to gather accurate information and take the necessary steps to mitigate the problem.